Hexagon led Lights

Premium LED Hexagon Lighting for Garage & Workshop – ZT1018

      • Sample protocol: 1-2 days
      • Supply ability: 150,000 pcs/month
      • Response time: ≤3h
      • R&D engineer: 15
      • On-time delivery rate: 98%
      • QA/QC inspectors: 8
      • IP rating: IP54
      • Warranty: 2-5 years
      • Delivery: 5-10 days
      • Custom: OEM/ODM
      • CAD drawings or 3D renderings
      • Professional lighting solutions

    LED Hexagon Lighting ZT1018 – perfect for garages, workshops, and ceiling installations. Offers high-CRI, energy-efficient lighting with a modern aesthetic for professional and personal spaces.

Get A Quote
Contact Us

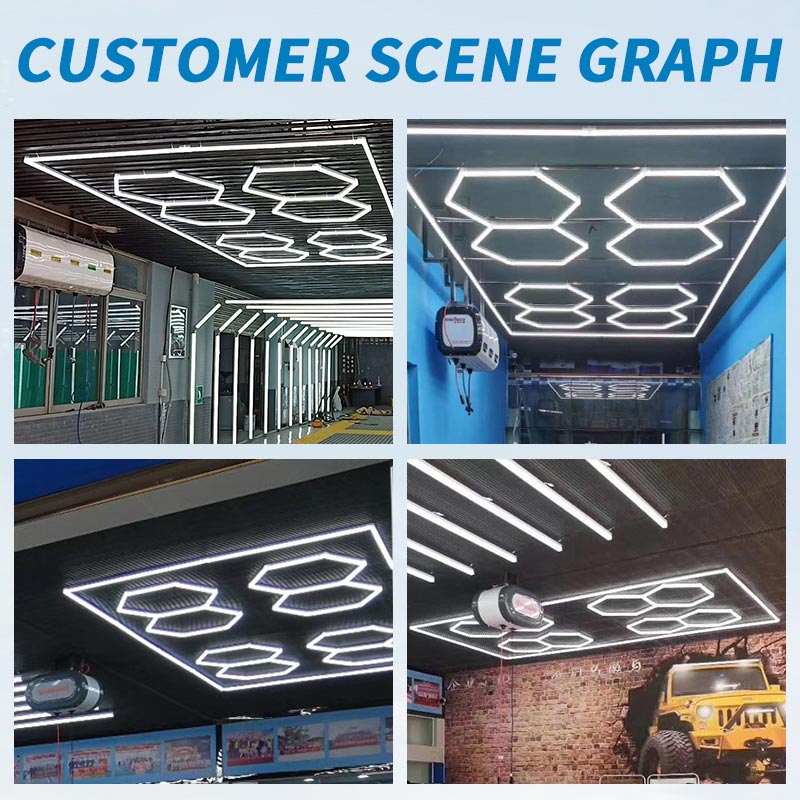
Hexagon lights for garage are a modern and versatile lighting solution, perfect for enhancing both residential and professional spaces. Featuring a distinctive hexagonal design, these lights are ideal for ceiling installations, creating a bright, inviting, and contemporary atmosphere.

In automotive garages and workshops, ZT1018 LED hexagon lights provide consistent, high-quality illumination, making it easier to work on vehicles and detailed projects with precision. Thanks to their energy-efficient LED technology, they reduce power consumption while delivering powerful, glare-free lighting. Whether upgrading your garage, workshop, or adding a stylish touch to a ceiling, hexagon LED lights offer both functionality and visual appeal.

Key Points

  • Shadow-free, non-flickering illumination
  • High CRI > 90 for accurate color rendering
  • Modular hexagonal design for custom patterns
  • Easy surface or suspension mounting
  • DIY assembly, suitable for creative layouts
  • Energy-efficient: 110–120 lm/W
  • Supports OEM/ODM customization and CAD/3D planning


LED hexagon lighting parameters:

Parameter Specification
Item Code ZT1018
Dimensions 2433mm x 4840mm (set)
Quantity/Set 9 pcs (Outline + Hexagons)
Material Aluminum + PC cover
Accessories PC connectors
Luminous Flux 110–120 lm/W
CRI >90
CCT 6500K
IP Rating IP54
Warranty 2 years


Where to Use


How to Set Up

  • Mount directly with screws or brackets
  • DIY-friendly assembly for custom patterns
  • Compatible with ceiling or wall installations
  • Quick installation reduces labor costs by up to 60%


Frequently Asked Questions

Q: Can these lights be mounted on walls?
A: Yes, ZT1018 supports ceiling and wall installation.

Q: Is assembly required?
A: Yes, but the modular design allows easy DIY assembly.

Q: What is the warranty period?
A: 2 years depending on configuration.


More Like This

  1. ZT1028 Hexagon LED Workshop Light – Modular design, high CRI, ideal for garages and detailing shops.
  2. ZG/E1016-1 LED Ceiling Panel Lights – Energy-efficient, shadow-free lighting for large workshops and creative spaces.
  3. Modular LED Light Tunnel for Garages – Perfect for car detailing, maintenance, and inspections with bright, uniform illumination.
  4. ZT1068 Adjustable Hex LED Ceiling Light – Customizable layout, DIY-friendly, suitable for garages and home studios.


Installation

Easier to install with integrated connectors, with no more individual wiring for each light section. Only 2 wiring points.

Download Installation Instructions Here

***Please consult with an electrician before installation to verify your electrical setup is sufficient!!

hexagon garage lights


WARNING!!!


Image 1 shows how the copper connectors are supposed to look.

diy hexagon lights


Image 2 and Image 3 show damaged copper connectors, which happen when the units are pushed together with excessive force.

diy hexagon led light

If two units do not seem to fit together easily, double-check that the connectors are accurately lined up, or try using a different lamp. Do not force the connection. Test the entire light set with a multimeter before hooking it up to an electrical source and before mounting it to the ceiling.


It is recommended to completely read this manual before assembling the product.

Please carefully read the “Circuit Diagram” before assembling

hexagon led lights Circuit Diagram


LED Hexagon Lighting System Parts List

No. Name Specification QTY Unit PIC
1 tubes Size: 440*20mm  Power: 6w 44 pieces  
2 tubes Size: 1185*20mm  Power: 16w 12 pieces  
3 connectors 90°  2-way   white 3 pieces  
4 connectors 180°  2-way   white 8 pieces  
5 connectors T-shaped  3-way  white 1 pieces  
6 connectors 120°  2-way   white 28 pieces  
7 connectors 120° Y connector   white 12 pieces  
8 The cable 1-end 5 pieces  
9 installation instruction 1 pieces  


LED hexagon lighting other parts list

Provided by buyers

No. Name Specification QTY. Unit PIC
1 Wires ≥1.5mm²   for wiring 5-15 m  


LED hexagon lighting Technical Data

Voltage AC220V
Power 456W
Current 5A
Luminous Flux 110-120lm/w
CRI. >90
CCT. 6500K (White)


Assembling instruction

1. Put all the lamps and connectors on the ground (as in the following picture).
1.2m lamps for the outline, 0.44m lamps for the inner structure, and the position of different connectors as the following picture shows:

diy hexagon led light Assembling

Pink O for 180° 2-way connectors hexagon light connectors

Yellow O for L-shaped 2-way connectors hexagon lights connectors

Blue O for 120° 2-way connectors hexagon led lights connectors

Red O for Y-shaped 3-way connectors hexagon led light connectors

Green O for T-shaped 3-way connectors  carage hexagon light connectors


2. Connect the tubes (Please be careful while connecting tubes with the connector, or the copper needle in the connector would be damaged)

hexagon light Connect the tubes


LED Hexagon Lighting Circuit Diagram

hexagon light Circuit Diagram


Caution!

1. About the cable:
Red wire——Live Line
Blue wire——Null line
Yellow wire——Earth Line or Ground line
2. There are only 5 points for cable connection of the whole structure, parallel connecting the 5 cables and wiring to AC220V
3. TEST BEFORE FIXING TO THE CEILING.
4. Please install it with a professional electrician.
hexagon light cable

LED hexagon lighting Mounting instruction
How to fix it on the ceiling?

hexagon lights Mounting instruction


Scroll to Top